Detailed description of how different filters are added
There are a wide range of filters available.
- One Way Field Filter - filters all spots with an attribute value above, equal or below a specified value.
- Two Way Field Filter - filters all spots with an attribute value above, equal or below 2 times the value of another attribute.
- Value Filter - filters all spots with a value above or below a specified value in at least one or all channels.
- Ratio Filter - filters all spots with a ratio above or below a specified value.
- String Filter - filters all spots with an attribute equal or not equal to a regular expression.
- Manually Filtered - filters all spots manually marked to be filtered in Spot View or Replicate View.
If you are worried about spots that have no intensity in one channel, and high intensity in the other channel being filtered, you may consider doing flooring of the channel with no intensity before doing any filtering. Flooring means that spots with very low intensities or intensity values close to background intensity in one channel, while the other channel has higher intensities, are set to a particular value. You should be aware that it is not always a good idea to do flooring. See here for a discussion on flooring. Some people disagree with using a floor value.
IsWellAboveBG
- Click the
 button
- Choose the One Way Field Filtering button
- Select rIsWellAboveBG and set the value to 0. Makes sure = is selected
- Click the Filter button to see how many spots are filtered.
- Click OK to add the filter
- Click the button
- Choose the One Way Field Filtering button
- Select gIsWellAboveBG and set the value to 0. Makes sure = is selected
- Click the Filter button to see how many spots are filtered.
- Click OK to add the filter
Sometimes you may only want to remove the spot if both channels have too low intensity to pass this filter. If that is the case, you can combine the filters.
Spots flagged by Feature Extraction (FE) (Agilent)
All flags from FE can be removed this way.
- Click the button
- Choose the One Way Field Filtering button
- Select rIsFeatNonUnifOL and set the value to 1. Makes sure = is selected
- Click the Filter button to see how many spots are filtered.
- Click OK to add the filter
- Click the button
- Choose the One Way Field Filtering button
- Select gIsFeatNonUnifOL and set the value to 1. Makes sure = is selected
- Click the Filter button to see how many spots are filtered.
- Click OK to add the filter
Combining filters
- Select the filters you want to combine by pressing Ctrl while clicking on the rows of the filters you want to combine.
- Right click on one of the rows and select a combine option from the list.
% foreground pixels above 2x the standard deviation of the Background
- Click the button
- Choose the One Way Field Filtering button
- Click the combobox saying Block, and select %>B635+2SD. Set the > box to < and the value to 60.
- Click the Filter button to see how many spots are filtered.
- Click OK
This removes all spots where less than 60 % of the foreground pixels are above 2x the standard deviation of the Background. Basically, this removes spots to close to the background for the B635 channel.
- Click the button
- Choose the One Way Field Filtering button
- Select %>B532+2SD and set the value to 60. Make sure < is selected.
- Click OK
This does the same as the above filter for the 532 channel.
Flags (GenePix)
- Click the button
- Choose the One Way Field Filtering button
- Select Flags and set the value to 0. Make sure < is selected.
- Click OK
This removes all spots flagged by GenePix (e.g Spots not found)
Filter Saturated Spots ( Agilent )
- Click the button
- Choose One Way Field Filter
- Select rIsSaturated in the first combobox
- Select = in the second combobox
- Type 1in the text field.
- Press OK to add the filter
- Click the button
- Choose One Way Field Filter
- Select gIsSaturated in the first combobox
- Select = in the second combobox
- Type 1in the text field.
- Press OK to add the filter
Filter Saturated Spots (GenePix)
There are two ways of filtering saturated spots. One way is to filter all spots with an intensity close to the saturation value, or you can filter all spots where a certain % of the pixels within a spot is saturated.
- Using Value Filter
- Click the button
- Choose Value Filter
- Find the saturation value for your data. Saturation value for GenePix is 65535. Filter elements with value >= Saturation value.
- Click Filter to see how many spots will be filtered.
- Click Ok
- This filters all spots with saturated intensity (median or mean) in one or all channels.
- Using One Way Field Filter
- Click the button
- Choose One Way Field Filter
- F635%Sat. > e.g. 60
- Click Ok
- This filters all spots for which more than 60% of pixels are saturated in 635 channel
- Click the button
- Choose One Way Field Filter
- F532%Sat. > e.g. 60
- Click Ok
- This filters all spots for which more than 60% of pixels are saturated in 532 channel
Filter control spots
Often the control spots are marked in some way in you datafile. To remove these from your dataset you need to know what the control spots for your arrays are called. You may need more than one filter to cover all types. All filters will be String Filters.
- Click the button
- Click String Filter. Here you see 2 comboboxes and a text field.
- In the first combobox you select the column id to use for filtering. (e.g. Agilent: ControlType)
- Set the second combobox to Equals or Not Equals depending on the text you type in the following text field. (e.g. Agilent: Not Equals)
- Type the ID of the control spot in the in the text field. (e.g. Agilent: 0) Often there will be very many different ID's, so you will need to use regular expressions to filter as many control spots as possible in one go. If you need to use more than one regular expression you can write them all on the same line, separated with |
Manually filter spots
This filter is used to filter spots that have been manually marked for filtering. Manual marking for filtering can be done in Spot Image Viewer and Replicate Viewer
- Click the Add Process button
- Click Manually Filtered
- Click on the Filter button to see how many spots are filtered.
- Click Ok
Mark spots for filtering using Spot Image View
- Click the button
- Click the Other button.
- Click the Spot Image View button.
- Click OK to add this component to the processing batch. Adding this component to the end of the processing batch and the clicking Run, allows you to do a dry run of the filters and view which spots have been filtered directly in the image file.
- In the RUN column of the Processing tab of the SpotPix Suite, click on the Spot Image View row.
- Click on the View Mask checkbox
- Click on the View Flags checkbox
- Click on the View Filtered checkbox.
- To change the colour of either the View Mask, View Flags, View Filtered or View UserFiltered, click on the coloured square behind each and select a different colour.
- See that no “good” spots are filtered by checking and unchecking the checkboxes. If "good" spots are filtered you may want to change the filter parameters or select a different filter in the above steps.
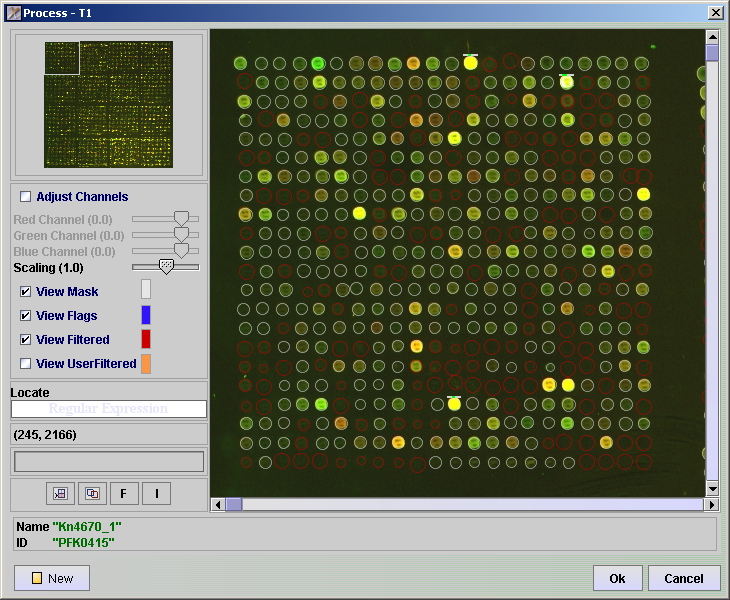
- It is also possible to manually flag spots that you want to filter. Click in the View UserFiltered checkbox
- Click on the F button.
- Click on spots that you want to flag, that have not already been filtered.
- Click Ok
Mark spots for filtering using Replicate View
- Click the button
- Click the Other button.
- Click on Replicate View. Here you can compare in-array replicates and remove poor ones.
- Replicate spots are merged into one row
- Click on the Ratio STDev header to sort the entries after ascending standard deviations.
- Scroll to the bottom and select one row with large standard deviation.
- Click on the Details Selected button. This will give you a list of all the replicate spots.
- Select rows with low intensity values that have not already been filtered
- Click Filter Selected
- Close Replicate Details
- Click Ok in the Replicate Viewer